How to Change CC3D Flight controller OS
CONVERT CC3D OS
OPENPILOT TO CLEANFLIGHT/BETAFLIGHT
CC3D
- Remove Props and pull apart Quad
- Download OpenPilot GCS 15.02.02, You may also need the STM32 Virtual Com Port driver.
- Install the Cleanflight Configurator from the Chrome Web Store.
- Download Cleanflight 1.10 firmware .bin or Latest Betaflight CC3D BIN File from hereNOTE: You need .bin file – so thats why we have put Cleanflight 1.10 ONLY, versions after this do not have .bin file.
For difference on Cleanflight vs Betaflight view this article. - On openpilot and open the firmware tab. Click rescue then plug in your Quad to computer via USB (no power)
- Click open and select .bin that you downloaded.
- Click the checkbox, I know what I’m doing!
- Click Flash
- WAIT TILL 100%
- IMPORTANT! Leave USB plugged in and power the board via esc input
- Click boot (in same firmware window), motors will beep and wait till blue light on the cc3d is steadily blinking
- Close openpilot
- Unplug everything
- Open cleanflight
- Power your Quad and plug usb back in now.
- Click connect. (if it fails, try changing the port)
- Congrats! You now are on Cleanflight. To connect your Quad to Cleanflight you always need to use power now, plug in your battery!
- Place Quad on flat surface and under setup, click calibrate accelerometer.
- Change minimum throttle to 50 above what your receiver shows on Receiver tab. (usually 1000, so put 1050)
- Click Save and reboot
- Now goto your PID tuning.
- Change PID Controller to LUXFloat
- Click SAVE
- Now change the following
Change roll rate to 0.70
Change pitch rate to 0.70
Change YAW rate to 0.40
TPA should be 0.00
TPA breakpoint should be 1500 - Now goto receiver tab, and check all your transmitter channels are correct, they usually are different and you will need to reconfigure.
- I have the FlySky FS-R6A receiver, so for me, I had to move the following.
Ch 1 moved to Ch3
Ch 3moved to Ch 5
Ch 4 moved to Ch 1
Ch 5 moved to Ch 4
(You may need to swap Ch 2 and Ch 4 around if your pitch and roll is incorrect. - Now on the right (still receiver tab) change throttle to 0.50, throttle EXPO to 0.00, RC rate to 1.00, RC expo 0.00 – Save
- Now you want to set up your AUX Switches, open the Modes Tab.No mode selected = ACRO+ / Rate mode by default.Altitude mode = Angle Mode
Rattitude mode = Horizon Mode
If you your switch only has two positions it would look something like this.
0 = Horizon Mode
1 = Acro/RateIf you have a switch that has 3 positions it may look like this.
0 = Angle
1 = Acro/rate
2=Horizon - If you have more than six channels you may want to setup ARM as a switch, as well as a buzzer, or lights.
- Now save your settings. By moving your switches you should be able to test the setup. Green = mode activated, grey means Acro/Rate mode.
- Now we need to calibrate ESC, go to the motor tab. remember, you should have removed props at the start, if you didnt, DO THIS NOW.
- Unplug battery
- Slide Master to MAX
- Plug in battery, wait for beeps.
- Slide Master to MIN
- ESC Calibration is now complete, however you must test that it has worked corectly.
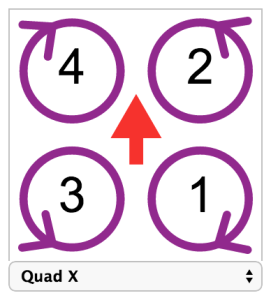
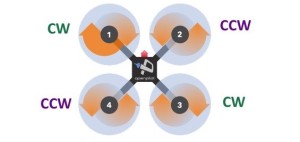
Arm copter, and all motors should spin at 0 throttle. If only some do, you need to redo the above steps until they are all spinning correctly. - You now need to swap motor configuration as cleanflight configuration is different as per below.
LEFT is openpilot RIGHT is Cleanflight 

- Copy and paste the below into the CLI tab.
mixer custommmix resetmmix 0 1.0, 1.0, -0.93, -1.0
mmix 1 1.0, -1.0, -0.93, 1.0
mmix 2 1.0, -1.0, 0.93, -1.0
mmix 3 1.0, 1.0, 0.93, 1.0
save - Your cc3d will reboot. Give it a test flight! Make sure you are open space in case you missed a step and it crashes.
Comments
Post a Comment